Last-Minute DIY Halloween Decorations You Can Make in a Day

Halloween is only a week away, and you haven't decorated yet? Don't worry, I've got you covered!
When my son asked if we could put up our Halloween decorations, I realized I still had a few projects left unfinished from last year.
Our boys have always loved Halloween, especially the gory, spooky decorations.
Last year, I made four faux boarded-up windows but ran out of time before finishing the rest.
This year, I made four more and decorated our entire house in just one day!
Here are six easy, budget-friendly DIY Halloween decorations you can make before the first trick-or-treater arrives.
1. DIY Faux Boarded-Up Windows
I've always loved the look of old houses, so I wanted ours to look abandoned and condemned.
These faux boarded-up windows are made from inexpensive, lightweight wood, making them easy to install and remove.
Tip
Some hardware stores have a reject pile where you can take things like scrap wood for free.
What You'll Need
- 1x2 furring strips
- Inexpensive 1x4 boards
- Leftover stain or paint
- Nail gun, screws, or construction adhesive
- Measuring tape and saw
1. Paint your boards using different shades of leftover stain or paint.
I used chocolate brown, lighter brown, and ebony black. Add splatters and smears to create an aged, weathered appearance.
2. Measure from the top of each window to the sill. Cut two 1x2 furring strips to this length. These will serve as the vertical braces.
A laser level makes the job even easier!
3. Measure the window's width and position the braces to fit inside the frame.
4. Cut the 1x4 boards and attach them across the braces at different angles using a nail gun, screws, or construction adhesive.
Don't make everything symmetrical! Vary the angles so neighboring windows look different.
5. Test the finished panel inside your window. Leave a little wiggle room for easy installation and removal.
I painted the boards before assembling them this year, which allowed me to decorate other areas while they dried.
2. Decorate With Creepy Halloween Fabric
One of my favorite Halloween decorating shortcuts is creepy fabric, sometimes called freaky fabric.
It's torn, full of holes, and instantly makes ordinary decorations look spooky.
I wrapped Halloween lights around our doorway and porch handrails, then draped the fabric over the area to create a worn, haunted-house appearance.
3. Create Creepy Glowing Porch Lights
This easy decoration always gets a reaction! We've been doing it for years, and all you need is an old Halloween mask.
Position the mask around your porch light to create a creepy glowing face. Adding fabric around the mask enhances the spooky effect, especially when the eyes light up at night.
Don't have porch lights? Try a mannequin head painted black with battery-operated lights for a similar effect.
Safety First
Keep masks and fabric away from hot bulbs and avoid covering fixtures that could overheat.
Redesign Recommends! Want that eerie glow without worrying about hot bulbs? The Bethlehem Lights Indoor/Outdoor 3-in-1 Drop-In Fairy Lights run on batteries and have six posable strands of 72 LEDs that flip from warm white to multicolor, so you can tuck them into a porch planter or behind a mask for a glowing face. A remote with built-in timers turns your display on every night by itself, and they're on sale now at QVC.
4. Make a Creepy Porch Figure From Old Clothes
Meet Herman, our creepy porch visitor! Every Halloween, Herman sits in a chair on our porch, frightening passersby. Even dogs bark and growl at him!
Here's how we make him:
1. Place pieces of wood inside old boots to create a stable base.
2. Add old jeans or workout pants and stuff the legs with T-shirts or beach towels.
3. Use a five-gallon bucket for the body and a smaller bucket for the head. This was my son's clever idea!
4. Dress the buckets in a hoodie, stuffing the arms to create a fuller shape.
5. Pull a creepy mask over the smaller bucket and add rubber hands or old gloves.
We finish Herman with chains, changing the arrangement slightly every year. Once he's lit up at night, he's incredibly creepy!
The best part? Almost everything comes from supplies we already have at home.
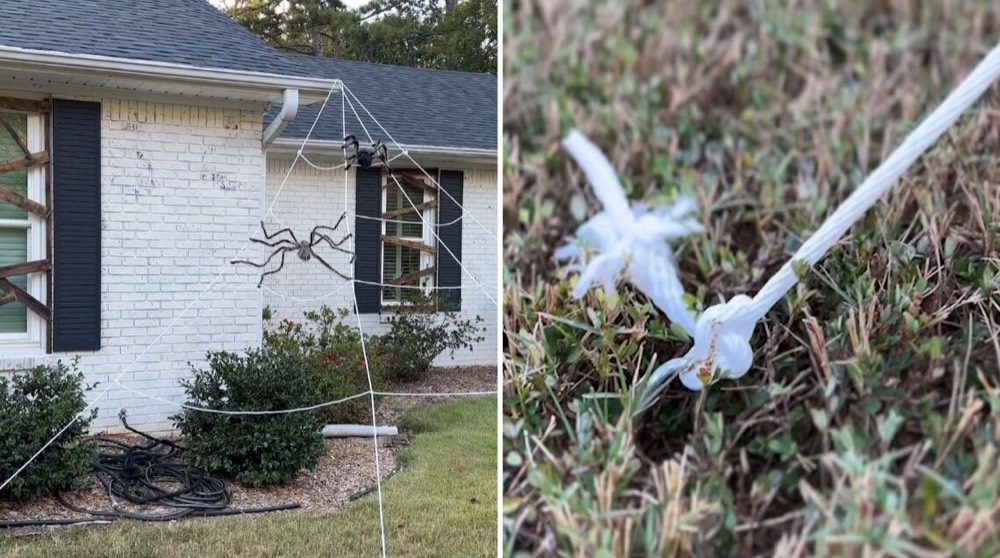
5. Make a Giant DIY Spiderweb
You can buy giant Halloween spiderwebs, but they're also incredibly easy to make with rope.
- 100-foot clothesline
- Tent or fence stakes
- Giant decorative spiders
1. Measure from your planned attachment point on the house to the ground.
2. Cut four rope sections, tie them together at one end, and secure them to the house.
3. Spread the ropes outward and secure them to stakes in the ground using double knots.
4. Starting about 18 inches below the top, tie additional ropes across the anchor lines to create the webbing.
I added four rows before finishing with a giant spider. If you can tie your shoes, you can make this spiderweb!
6. Refresh Old Foam Gravestones
I had some struggling azalea bushes in our side yard that turned out to be the perfect backdrop for a spooky graveyard.
I already owned inexpensive foam gravestones, but I didn't love their colors. So I mixed a few craft paints and gave them a more uniform, aged appearance.
Final Thoughts
You don't need weeks of planning or an expensive shopping trip to create a spooky Halloween display.
These projects make a big impact using inexpensive materials and things you already own.
I decorated our entire house in one day, and with a little creativity, you can too!